Before I get to the pies, I thought I'd post a picture of Elora....
Last Friday, we went to a music concert for Cam's nephew, who is leaving for a mission to Argentina. We gave the kids strict instructions that they were to be quiet. I was impressed to see how nicely they sat with their coloring books and boxes of felt pens/pencil crayons. Then, about an hour inot the concert (2/3 over), I look over and there was Elora.... sticking these big googly eyes all over her forehead. I couldn't help but giggle. Sometimes my kids are so darn goofy. I love it. Next thing I knew, Emily also had extra eyes as well. Abigail was thoroughly disgusted by it all... because Elora was licking them to help them stick if they wouldn't stick on their own. Anyways, it was pretty funny. Thanks for the great laugh Elora!!
So, my parents invited us to come over tonight. I'm supposed to bring dessert. Let me just say that I'm a "food snob" in the fact that I like home-made desserts and rarely like store bought. I'll also say that, as much cake as I make, it will never be my first choice in dessert. Far from it actually. So, tonight's dessert is going to be lemon meringue pie. One of my favorites.... but it has to be home-made. For some reason, I find store-bought pie unbearable. Okay, and I'm picky about looks too.... so if it doesn't look good, I don't usually touch it (that goes for just about anything) I'm not picky, but I am. If that makes sense.
Anyways, I thought I'd post some pictures of how I like to make pie....
My favorite recipe (I learned from my Mom.... which is very close to the recipe on the crisco box, but not quite) It's ALWAYS nice and light and flakey!
In a bowl, combine
2 c. flour
1 tsp. salt
1 c. Crisco shortening.
(this is enough for 2 lg pie crusts.... or one pie with a top and bottom)
Use a pastry cutter and cut it into small pieces. Pea sized.
Next, we're going to add 4 Tbsp. of ice water (okay, I just use really cold water from the tap).
Sprinkle 2 Tbsp. on the dough first. Use a fork to mix lightly.
Sprinkle with the last 2 Tbsp. of water. Use a fork, then your hands.
*Handle the dough very little!! Mix it just enough that it will form into a ball... and even then, it still barely holds. Remember, very little. Should look kind of like this...
Next, you're going to want to roll it out. I like to roll my dough out between two pieces of parchment paper, but you can use wax paper. Make sure you sprinkle flour on the paper before you put the dough down, and then put a little on top as well.
Then to get the dough into the pan, I just lift if up right on the paper, place it over the pan and peel the paper off. I push the sides down and make sure there are no air pockets. Finish off the edges however you like to and poke lots of holes in the bottoms and sides (don't poke the holes if you're doing a pie that has a top.... like apple or rhubarb or such)
Bake your pie crust at 425F for 8-12 minutes.
For the filling, I like to use the Jello brand of lemon pie filling. I like it the best! Just follow the instructions on the back of the box. Remember, one box makes enough for one pie. So, if you're like me and you're making both pie crusts, you'll need to make 2 boxes!
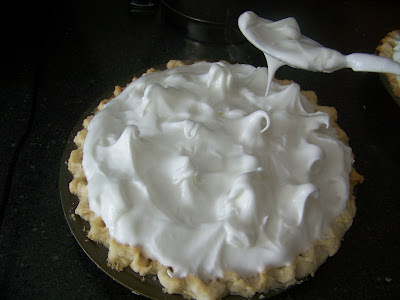
The meringue is my favorite part to make. Once again, follow the instructions on the back of the Jello box. I think the key part, is how long to mix your meringue. The box says until it forms stiff peaks. I like to stop just before.... when you can lift a spoon and the peak will FLOP over and hold it's shape. It'll look like this.....
Make lots of little peaks on top. Don't just spread your meringue smooth on top.... make it look pretty! Then, when you've thrown it back into the oven for a few minutes, it'll come out looking like this....
Yum! Don't you just love lemon meringue pie too??
Monday, 28 March 2011
Sunday, 27 March 2011
Pumpkin Spice Cake
I LOVE PUMPKIN.
Just about any recipe, if it has pumpkin in it, I know I'm going to like it. My friend Jen once gave me a recipe for her pumpkin spice bars. They're not really "bars"... they're more like cake... cooked in a flat, large cookie sheet. But, they're delish! And each time that I make them, everyone loves them.
So, for my Grandma's birthday cake, I decided to use this pumpkin spice bars recipe and cook them as a cake. It turned out so good!! I think it just might be one of my favorite cake recipes! So yummy and so very moist. And with cream cheese icing to top it off, what could be better??
If you're interested in making some.... here's the recipe.....
Pumpkin Spice Bars (cake)
Mix together
4 eggs
2 c. sugar
1 c. oil
1 can pure pumpkin (16 oz.)
2 c. flour
2 tsp. baking powder
1 tsp. baking soda
1/2 tsp. salt
1/2 tsp. ginger
1/4 tsp. cloves
2 tsp. cinnamon
(I also like to add an extra tsp. of pumpkin pie spice and some nutmeg)
Spread into a large cookie sheet. Bake at 350F until cooked (about 20 minutes.... surprisingly, I don't have an actual time written down on my recipe. So, keep an eye on it)
This would be a good amount for a 8x8 cake.... so, alternatively you can divide the batter into two 8x8 pans and cook for approx. 35 minutes.
When cooled, cover with your favorite cream cheese icing. ENJOY!!!
Saturday, 26 March 2011
98 and Fabulous!
My Grandma Orr is Fabulous!!
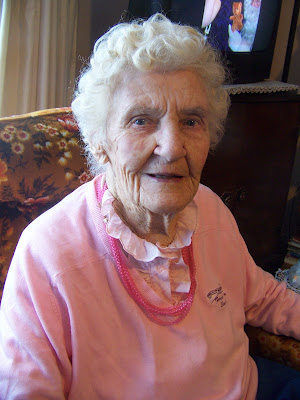
She'll be celebrating her 98th birthday in a week and she's looking so good. I don't know what it was, but today she looked so good. Maybe it was her cute pink outfit (pink being her favorite color!) or maybe it was the fact that she just had her hair done at the neighborhood high school. I don't know, but she's looking good!
I had the opportunity to make my Grandma's birthday cake. I was quite excited. I tried quite a few new things. I made calla lilies for the first time... after watching a youtube tutorial. I also decided to try and do some brush embroidery on the sides too, something I haven't done before either. I think it turned out quite well. Here's some pictures....
Grandma loved her cake when she saw it. All those pink flowers, just for her.
It was a good birthday gathering and I was so glad that we could be there to help her celebrate. One day I hope I can be like my Grandma. To live to be 98 too. To live an independant lifestyle, in my own home, at that age. I think my Grandma is very inspiring.
Happy early Birthday Grandma!! We love you!!
Wednesday, 23 March 2011
A Feeling of Gratitude
It's very easy to go through each day and be so caught up in all the LITTLE things in life. A lot of time those LITTLE things, seem like really BIG things. It's hard to look past it all. Maybe the kids are fighting lots, maybe the car is having issues, maybe finances are tight or maybe life is so over scheduled and there's no time to sit and relax. But every once in a while, something comes along and you have an AH HA moment and realize, all those little things don't really matter.
Today is one of those days. I'm left with a feeling of overwhelming gratitude for all that my Heavenly Father has blessed me with.
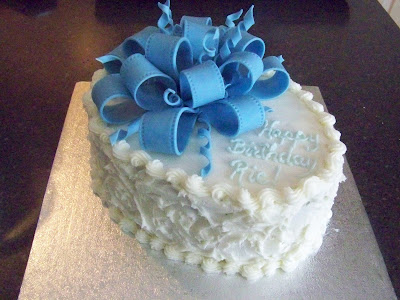
Many of you that know me, have probably heard me talk at some point about Ric and Tracy and their family. Today is Ric's birthday. He's 42 today and that's something to celebrate. Ric reminds me a lot of Scott, my brother. When Scott passed away, he was 41, almost 42. And when I think of Ric and the rest of his family, I quite often think of my own family. You see, Ric won't celebrate another birthday. This will be his last.
When I stopped by their house yesterday, Tracy mentioned that it was Ric's birthday today and I just knew I had to make a cake. Ric and Tracy have 3 little girls. Birthdays are always a big thing for little kids. A birthday cake probably won't matter to Ric, but it would matter to his girls. So, last night I baked a chocolate cake and decorated it simply with a big fondant bow.
This morning I took it to their home. Their oldest daughter, who is 10, answered the door. Her face instantly lit up. She even exclaimed "Oh, it's just like the cakes on Cake Boss!" She was thrilled. Hopefully the 3 girls can put candles on it and blow them out for their Daddy as they celebrate his birthday.
I'm thankful I could bring just a small dose of happiness to their home today.
So, all the little things that can be frustrating and occupy our minds, etc are NOTHING really, when you think about it. I am very blessed to have a family that is healthy. I think today is a day to reflect on our many blessings. We're so blessed and I'm thankful for the reminder.
And I'm truly thankful that I can help this family in such small ways because it blesses my life as much as theirs.
Tuesday, 22 March 2011
Fondant Babys Breath
So, today I'm making some babys breath out of fondant. I'm thinking I might use it on the cake I'm going to make this weekend. Babys breath is a little finicky to make, but it's such a great way to fill in extra space between fondant flowers.
So, here's how I make them....
First off, you need some wire. Here I just bought some green colored, 32 gauge wire. These ones are cloth (thread) covered wires. I'd prefer to use paper covered wires, but there isn't a store close by that sells the paper covered ones. These ones I bought at Michaels.
I cut the wires so they're about 1 1/4" long or so. I don't measure them. It's not going to matter too much how long they are exactly.
Next, I use needle-nosed pliers and I curl the ends of each wire. Why do this? It will help to hold your flower in place. Any flower you make, any gauge of wire, you always do this. I make sure I get just a small loop, I usually just wrap it around the nose of the pliers part way and then squeeze it the curl closed, making it a very small looped curl.
You're going to need lots. For one little bunch of babys breath, you need 6. So, lots and lots.
Next I roll out my fondant or gumpaste. Don't roll it out too thin. Maybe 1/8" or so. When you're not using it, make sure you cover it up with saran wrap, so it doesn't dry out on you. I have the Wilton's "Beautiful GumPaste Flowers" kit, and I use the smallest 5 petal flower cutter to cut out lots of little flowers.
Flatten and smooth out the little flower cutout by putting it onto a piece of thin foam and using a ball shaped tool.
Now, I've made these flowers 2 different ways. First, I'll show you pictures of how I learned how to do it and then I'll show you another way. The end results are about the same.
First way is to poke a hole in the middle of your little flower and thread your wire through it, up to your little loop that you made. then you'd carefully fold the flower in half and then in half again. Being very careful not to squish your flower in the process. You only want to pinch the very bottom on the flower.
Alternative way....
Fold your little flower in half first, then lay the wire in the middle of your folded flower. Then fold into quarters. Same thing as before... don't squish your flower. Pinch the bottom only. Both ways. Oh, I should mention that it's best to wet (not too much!) your wire before you make your flower. If it's damp, then your flower will stick better. Though, you can get away with not getting it wet.
Your flower should look something like this...
Let them dry completely by sticking them in a foam block. When dry, you can use florist tape and put them in groups of 6.
That's it. You can then use them on a cake with other flowers. Here's a cake that I used Baby's Breath on....
If you've found this tutorial helpful, leave me a note and let me know if you've tried your hand at it and how it worked out for you. Don't be shy!
Monday, 21 March 2011
Best Entertainment
I've concluded that PAPER AIRPLANES are the best entertainment for kids!
Why are they so great?
They're cheap and easy to make
You can color and decorate them
Simple variations can change the way they fly
They can do tricks.... circles and loops and dives
If you lose it, you can just make a new one
And best of all, when you get tired of them you just throw them in the garbage
I think my kids can spend HOURS playing with them. It's not uncommon to see several lying around my house.
Okay, I'll also admit that I'm not the greatest airplane maker. If asked to, I'll only make one type of plane, but that one kind ALWAYS flies good. It's a great plane. I once got one of those page-a-day type of calendars and each day was a different paper airplane. It was good. I think we made 3/4 of them and then the kids lost interest for a while. I think the rest of that pack of paper is in the craft drawer some where. Maybe we'll have to dig it out so the kids have a new variety of planes to play with.
Here's how I make my favorite planes..... I think you should be good with just some pictures....
Sometimes I don't make those extra folds on the sides and I just leave the wings flat.
So, make a paper airplane with your kids today! Happy flying!
Subscribe to:
Posts (Atom)